my.tradePay
Start a payment transaction.
Sample
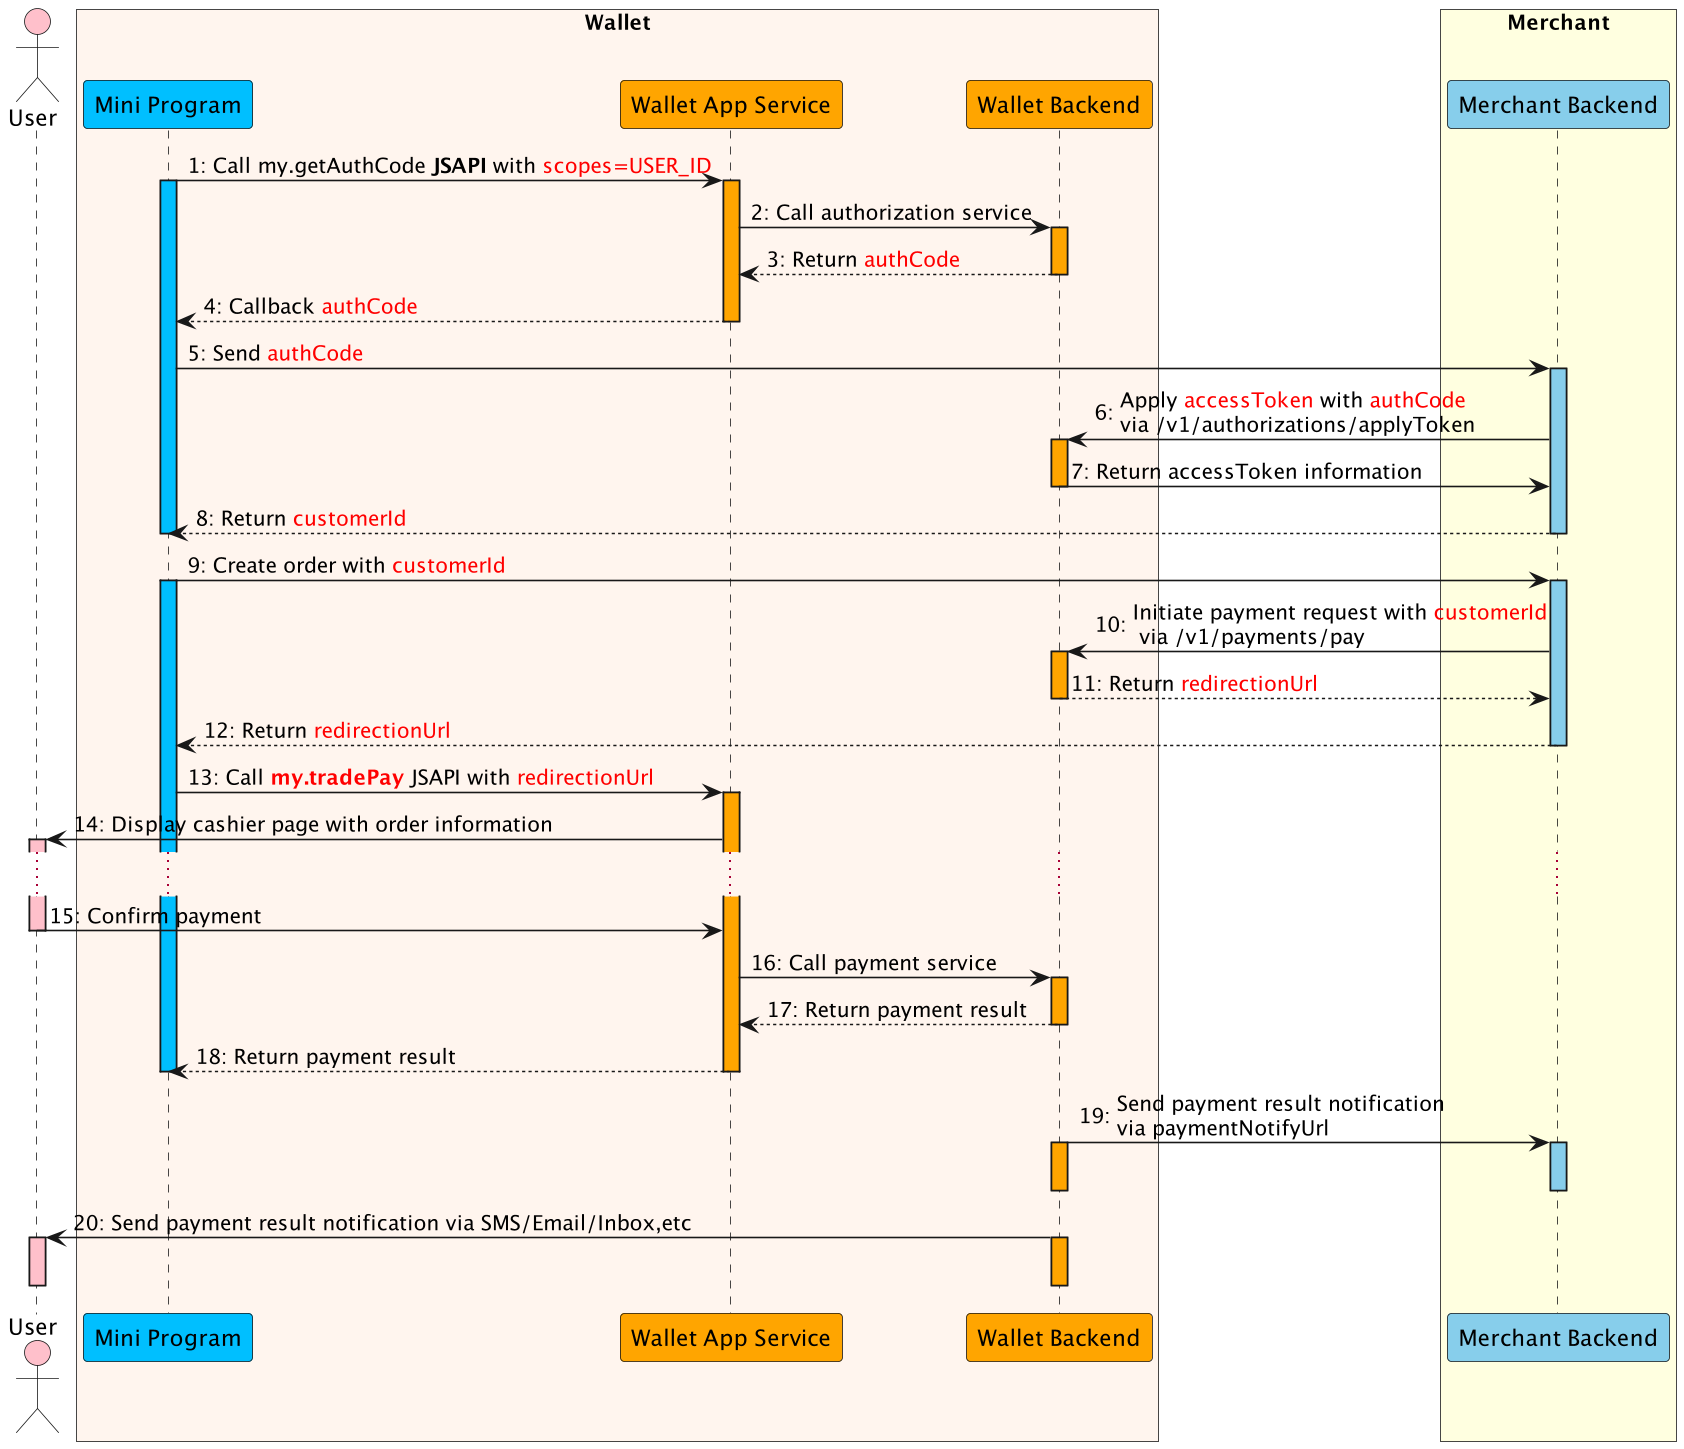
For example, a user purchases a 100 IQD good at the merchant/partner(online merchant usually) , the merchant/partner calls this API to create the payment order first, the wallet will return the payment order ID and wallet cashier page URL to the merchant/partner, then merchant/partner can redirect user to wallet cashier page with the my.tradePay API.

- The Mini Program calls this my.getAuthCode JSAPI with specific scopes(USER_ID) to request an authorization code.
- The E-wallet App service calls authorization service to processes the authorization information.
- The E-wallet backend verifies the authorization information, generates the authCode and returns.
- The E-wallet App service returns the authCode to the Mini Program.
- The Mini Program sends the authCode to the merchant backend.
- The merchant backend calls the applyToken API with authCode to apply the accessToken.
- The E-Wallet backend returns accessToken information to the merchant backend, such as customerId, accessToken, refreshToken, etc.
- The Mini Program creates an order with customerId.
- The merchant backend calls the payment API to initialte payment flow, including customerId as referenceBuyerId, paymentNotifyUrl(optional), etc.
- The E-Wallet backend returns payment detail information the merchant backend, such as redirectionUrl.
- The merchant backend passes the payment detail information to the Mini Program.
- The Mini Program calls the my.tradePay JSAPI with redirectionUrl to conduct the payment.
- The E-Wallet App Service displays the cashier page with order information, such as amount, order details, etc.
- The user confirms the payment in the cashier page.
- The E-Wallet App Service calls payment service and execute the payment process.
- When the payment reaches the final status, the E-wallet backend returns the payment result to the Mini Program (Step 18).
- Also the E-wallet backend notifies the merchant backend of the payment result with paymentNotifyUrl provided in Step 10(Step 19).
- Finally, E-wallet backend notifies the user of the payment result via SMS/Email/Inbox message (Step 20).
Request
my.tradePay({
  paymentUrl: "https://www.wallet.com/cashier?orderId=xxxxxxx", // get the redirectUrl from the server first
  success: (res) => {
    my.alert({
      content: JSON.stringify(res),
    });
  },
  fail: (res) => {
    my.alert({
      content: JSON.stringify(res),
    });
  }
});
Parameters
Property | Type | Required | Description |
paymentUrl | String | No | The redirectUrl of cashier page which is obtained from redirectActionForm. Refer here for details. |
success | Function | No | Callback function upon call success. |
fail | Function | No | Callback function upon call failure. |
complete | Function | No | Callback function upon call completion (to be executed upon either call success or failure). |
The Mini Program could use paymentUrl to start a payment transaction according to the payment service provided by the host app.
Success Callback Function
The incoming parameter is of the Object type with the following attributes:
Property | Type | Required | Description |
resultCode | String | Yes | The result code of the pay process. |
An example of a successfully returned message is as follows:
{
    "resultCode":"9000"
}
Result Code
resultCode | Description |
9000 | Payment is successful. |
8000 | Trade is processing. |
4000 | Payment is failed. |
6001 | User cancels to pay. |
6002 | Network exception. |
6004 | Unknown pay result, may be success. |